How to Make a DIY Cement Planter from an Old Towel — Surprisingly Easy & Stunning Results
By Felixsr · Life Hacks · 7 min read
This post contains affiliate links. If you purchase through these links, I may earn a small commission at no extra cost to you
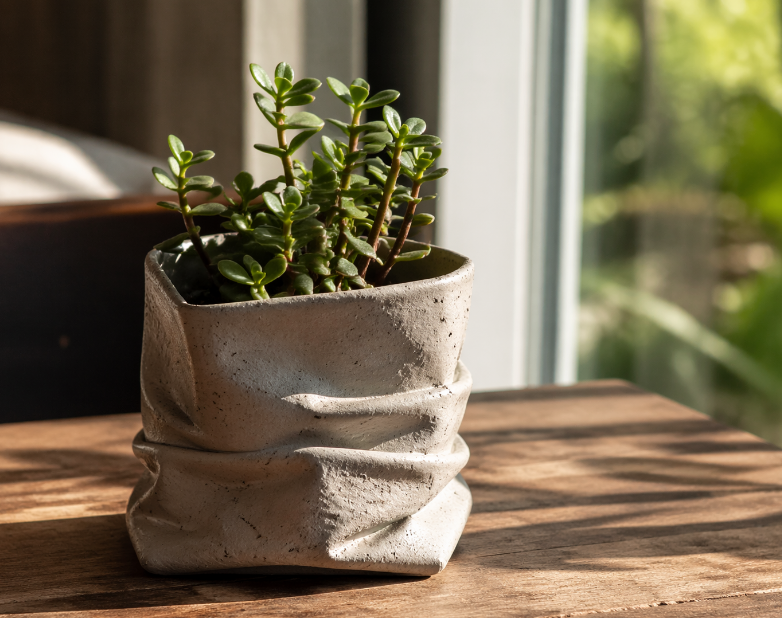
A DIY cement planter made from an old towel costs almost nothing — yet looks like a designer piece straight out of a garden boutique. Soak a towel in cement mix, drape it over a mold, let it harden, and you have a stunning one-of-a-kind planter with natural folds and texture no factory can replicate. Here’s the complete step-by-step guide, including the critical tips most YouTube videos skip.
Does It Really Work? The Science Behind DIY Cement Planters
Yes — this is 100% real and it works. When fabric is saturated with a cement slurry and allowed to cure, the cement binds to the fibers of the cloth and hardens into a rigid structure that permanently holds the shape of every fold and wrinkle. The result is a DIY cement planter that looks hand-sculpted, because it essentially is.
The technical process is called fabric hardening or ferrocement in its more advanced forms. It’s the same principle used in large-scale construction — fabric or mesh reinforces cement to create thin, strong, lightweight structures. Applied at home with an old towel, the result is a planter with natural organic texture that no mold or machine can reproduce.
“Fabric cement planters have become one of the most popular DIY garden projects because the barrier to entry is almost zero — an old towel, a bag of cement, and a bucket. But the results look like something from a high-end garden boutique. The natural drape of the fabric does all the artistic work for you.”
What You Need: Full Materials List for Your DIY Cement Planter
| Material | Details | Cost |
|---|---|---|
| Old towel or thick cloth | Thicker = more durable. Terry cloth towels work best | Free (reuse) |
| Portland cement | Standard cement mix — no gravel needed | ~$3–5 per bag |
| Mold / stand | Upturned bucket, bowl, or pot — anything to drape the towel over | Free (use what you have) |
| Plastic wrap / trash bag | Cover the mold so cement doesn’t stick to it | ~$1 |
| Mixing bucket + stick | Any old bucket for mixing the cement slurry | Free |
| Rubber gloves + mask | ⚠️ Essential — cement is caustic and damages bare skin | ~$2 |
Step-by-Step: How to Make a DIY Cement Planter from a Towel
Add water to cement powder gradually, mixing until you reach a thick mud-like consistency — similar to pancake batter. It should coat the back of a spoon without running off immediately. Too thin = weak planter. Too thick = won’t penetrate the fabric.
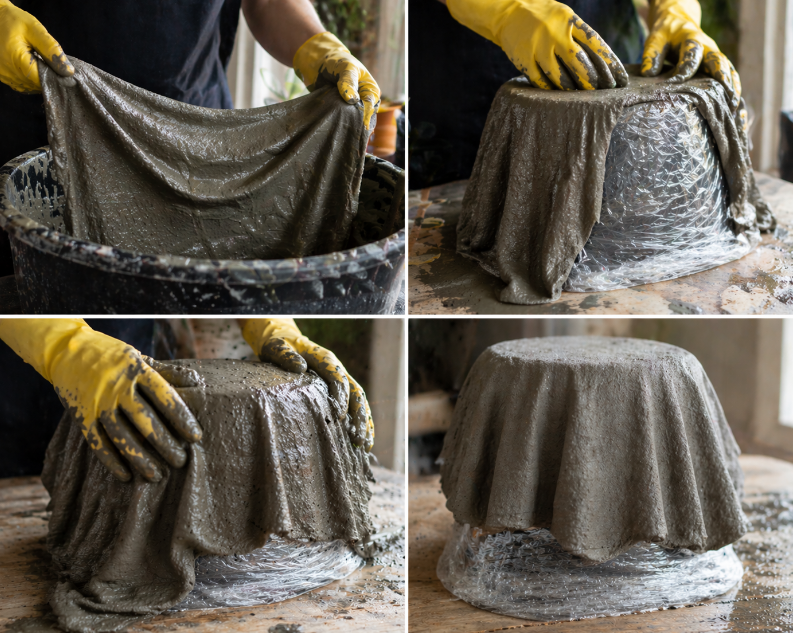
Submerge the towel fully in the cement mix. Knead and squeeze it thoroughly so cement saturates every fiber. You want the entire cloth uniformly coated — this is what gives the final planter its strength and stone-like density.
Wrap your mold (upturned bucket or bowl) with plastic wrap. This prevents the cement from bonding to the mold and makes removal easy later. Place it on a flat, stable surface where it won’t be disturbed.
Lift the soaked towel out of the mix (it will be heavy) and drape it over the mold. Arrange the folds deliberately — these become permanent. More dramatic folds = more sculptural result. This is where your artistic input matters most.
Leave in a shaded spot away from direct sunlight. Direct sun dries cement too fast and causes cracking. Cover loosely with plastic wrap if the weather is very hot and dry. Don’t touch or move it during this period.
Once fully hardened, remove from the mold. Drill a drainage hole in the base if you haven’t already. Sand rough edges if needed. Paint with acrylic or spray paint for color, or leave natural for a raw concrete look.
Critical Tips Most Videos Skip — Don’t Skip These
“The most common mistake beginners make is rushing the cure time. Cement that looks dry on the outside can still be soft inside at 24 hours. Give it the full 48 hours minimum — or even 72 for thicker pieces. Patience here is the difference between a planter that lasts years and one that crumbles in a season.”
Creative Variations: Beyond the Basic DIY Cement Planter
Once you’ve mastered the basic technique, the creative possibilities expand quickly. Here are the most popular variations:
| Variation | How to Do It | Best For |
|---|---|---|
| Colored cement planter | Add concrete pigment powder to your mix before soaking | Modern interior aesthetic |
| Lace-textured planter | Use lace fabric instead of a towel — delicate pattern embeds in the cement | Decorative indoor display |
| Hanging planter | Shape over a round balloon, embed wire hooks before curing | Balcony or patio display |
| Painted finish | Spray paint after curing — white for minimalist, terracotta for classic | Matching home decor theme |
Your DIY Cement Planter Checklist Before You Start
The entire project costs under $5 and takes about 15 minutes of active work. The rest is just waiting. The result is a completely unique, durable planter that genuinely looks like it cost $50+ from a garden boutique.
Best plants for cement planters: Succulents, cacti, small ferns, herbs (basil, mint), and air plants all thrive in cement planters. The natural weight and thermal mass of cement also helps regulate soil temperature.
Sources & Further Reading
- Original YouTube tutorial — Cement towel planter technique ↗
- The Spruce — DIY garden planter ideas and techniques ↗
- HGTV — Creative DIY planter projects for home & garden ↗
- Instructables — Fabric cement craft projects community ↗
- Gardening Know How — Best plants for concrete planters ↗
- Family Handyman — Working safely with cement and concrete ↗
🛒 Shop the Materials
──────────────────────
Portland Cement Mix
Rubber Gloves (Pack)
Mixing Bucket Set
Waterproof Sealant
Concrete Pigment Pack
⚠️ Safety note: Always wear protective gloves and a mask when working with cement. Keep away from children during the mixing process. Dispose of leftover cement mix responsibly — do not pour down drains.